Commercial Reverse Osmosis Plant: Installation Procedure
All plumbing work must comply to state and local plumbing regulations. Installation by a licensed plumber may be required in some localities.
-
1. Installation of a Faucet
If the sink has a sprayer, it may need to be disconnected in order to install the faucet. The sprayer connection will need to be sealed with a pipe cap or stopper, or the sprayer can be left attached under the sink.Check below to make sure the drill will not interfere with anything below before drilling the faucet-mounting hole (if no sprayer hole or other existing hole is used). A 2" smooth surface with a thickness of no more than 1-1/4" is necessary.For ease, the faucet should be positioned so that it empties into the sink and the spout swivels freely. No drilling is required if the sink already has a hole large enough for the RO faucet. Continue to install the faucet.

-
i) Porcelain, ceramic on metal, enamel, or cast-iron installation procedures:
To prevent chipping or scratching, special precautions must be taken when penetrating the porcelain through to the metal foundation.
- a. For the 1/4-inch pilot hole, use a center punch to mark the center.
- b. Drill a pilot hole through the porcelain with a masonry pit and stop when metal shows.
- c. To continue cutting through the metal beneath the porcelain surface, change the bit to a regular metal cutting bit.
- d. Using larger masonry and metal cutting tools, expand the pilot hole until it is 1/2 inch in diameter.
-
ii) Procedures for installing stainless steel sinks:
- a. For the 1/4-inch pilot hole, use a center punch to mark the center.
- b. Drill a pilot hole first.
- c. Continue to expand the hole with a larger drill bit until it is 1/2 inch in diameter
- d. Sharp edges should be cleaned up.
-
2. Faucet Mounting
Disassemble the treaded shank's hardware. Rubber washers and chrome base plates, glide up the shank to the faucet body.Orient the faucet by threading the threaded shank through the sink hole. Slide the lock washer and hex nut over the threaded shank from underneath the sink and tighten using a wrench.
-
3. Angle Stop Valve and Tubing Installation
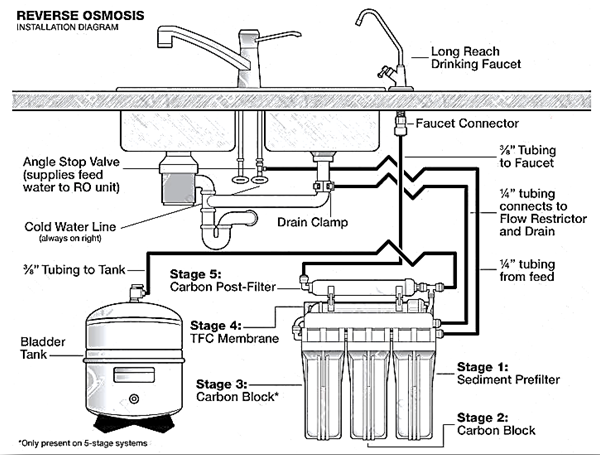
The John Guest Angle Stop Valve connects the angle stop (cold water shut-off) to the bottom of the riser tube in a simple and straightforward manner. The Angle Stop Valve has a built-in shut-off and serves as the reverse osmosis system's feed supply connection.
- a. Use the angle stop shut-off under your sink to turn off the cold-water flow.
- b. After you've turned off the valve, reduce the pressure by opening the handle on the cold-water side of your faucet.
- c. Disconnect the riser tube from the existing cold water shut-off with an adjustable wrench.
- d. To make place for the John Guest Angle Stop Valve, move the tubing away from the valve.
- e. Connect the John Guest Angle Stop Valve's swivel end to the cold water shut-threads. off's Only use your hands to tighten this connection.
- f. Use a wrench to tighten the riser tube to the male end of the John Guest Angle Stop Valve.
- g. Connect a length of 1/4" tubing to the Angle's John Guest Fitting onthe inlet of the RO unitand the Angle Stop Valve.
-
Installation of Drain Saddle Valve
The drain saddle valve is designed to fit around a standard 1-1/2" OD drainpipe and should always be installed before (above) the p-trap and on a vertical or horizontal drain to avoid clogging the drain line with debris.
- a. Place the drain saddle valve in the desired location and mark the opening with a pencil.
- b. Drill a 1/4" hole in one side of the pipe at the mark.
- c. Remove the backing from the gasket and stick the adhesive side of the drain clamp to the fitting half of the drain clamp around the hole.
- d. Place both sides of the drain saddle on the drain pipe so that the opening corresponds to the drilled hole. Verify that the drain clamp is properly positioned with a tiny drill bit.
- e. Bolts and nuts are provided to secure the drain saddle clamp to the valve. (Don't overtighten, and make sure the saddle halves on either side are evenly spaced.)
-
5. Tubing Connections Initial
It may be more convenient to complete under-sink tubing connections at this time for under-sink installations.
-
6. Installation of RO components
The reverse osmosis membrane, sediment cartridge, and carbon block cartridge(s) must all be put in the RO machine. The cartridges are packaged in a hygienic manner. When handling the cartridges, please wash your hands or wear gloves.
On the inflow side, the melt blown polypropylene sediment cartridge is first, followed by the carbon block cartridge(s) (CBC10-10). Both of these cartridges can be placed by inserting one end first and the other end second. The O-ring end of the membrane is inserted first into the membrane housing. Make sure the RO Membrane is pressed as far as it will go into the Membrane Housing.
-
7. RO Unit Installation
To attach the unit, raise it off the floor at least 2 inches, level it, and note the location of the mounting holes. Drill a hole for the mounting screws and screw them in place, enabling the mounting bracket slots to slide over them.
-
8. Placement of Pre-Fill and Supply Tanks
It's a good idea to pre-fill the storage tank so there's enough pressure to check for leaks and water to flush the carbon post filter. Connect the feed pipe that will serve the RO unit directly to the bladder tank to do this.
For this, a 3/8" x 1/4" reducer is included. Allow the water to fill the bladder until it reaches its maximum capacity. Close the tank valve, turn off the feed pressure, remove the reducer from the tank valve, and release the tube from the reduction.
The supply tank should be kept under the counter or within 10 feet of the RO system.
-
9. Final Tubing Connections
Complete final tubing connections using the following procedures once all components are in place:
- a. The tubing should be cut to fit the contours of the cabinets.
- b. Square cuts and a proper cutting tool are used to cut tubing to the desired length.
- c. Make sure the tubing is free of crimps.
- d. For optimal flow, keep the tubing from the RO unit to the tank and faucet as short as feasible.
- e. The drain line is only a quarter inch long. The membrane housing is attached to a tube. On this tube is a 3" cylindrical drain flow restrictor. The drain line connects to the RO unit at this point. The drain flow restrictor should not be removed since it will cause the system to fail.


